SELECT

정의 : 데이터를 검색할때 사용되는 문법

SELECT FROM

  • 기본 포멧

    SELECT <column_name_1>, <column_name_2>, ... FROM <table_name>

  • 전체 컬럼 데이터 조회

    1
    2
    sql> SELECT *
    FROM world.country
  • code, name 세개의 컬럼 데이터 조회

    1
    sql> SELECT code, name FROM world.country
  • 데이터 베이스 선택 : FROM 절에 world. 을 사용할 필요가 없다.

    1
    2
    sql> USE world;
    sql> SELECT * FROM country
  • alias : 컬럼의 이름을 변경할수 있습니다.

    1
    sql> SELECT code as country_code, name as country_name FROM country
  • 데이터 베이스, 테이블, 컬럼 리스트 확인

    1
    2
    3
    sql> SHOW DATABASES;
    sql> SHOW TABLES;
    sql> DESC city;

WHERE

특정 조건을 주어 데이터를 검색하는데 사용되는 문법

  • 비교연산 - 인구가 1억이 넘는 국가를 출력

    1
    SELECT * FROM country WHERE Population >= 100000000
  • 논리 연산 : AND, OR - 인구가 7000만에서 1억인 국가를 출력

    1
    2
    SELECT * FROM country
    WHERE Population >= 70000000 AND Population <= 100000000
  • 범위 연산 : BETWEEN

    • 인구가 7000만에서 1억인 국가를 출력

      1
      2
      SELECT * FROM country
      WHERE Population BETWEEN 70000000 AND 100000000
    • 아시아와 아프리카 대륙의 국가 데이터를 출력

      1
      2
      SELECT * FROM country
      WHERE Continent = "Asia" OR Continent = "Africa"
  • 특정 조건을 포함 : IN, NOT IN

    • 아시아와 아프리카 대륙의 국가 데이터를 출력

      1
      2
      SELECT * FROM country
      WHERE Continent IN ("Asia", "Africa")
    • 아시아와 아프리카 대륙의 국가가 아닌 데이터를 출력

      1
      2
      SELECT * FROM country
      WHERE Continent NOT IN ("Asia", "Africa")
    • 아시아와 아프리카 대륙의 국가가 아닌 데이터를 출력 (논리연산 사용)

      1
      2
      SELECT * FROM country
      WHERE Continent != "Asia" AND Continent != "Africa"
  • 특정 문자열이 포함된 데이터 출력 : LIKE

    • 정부형태에 Republic이 포함된 데이터 출력
      1
      2
      SELECT * FROM country
      WHERE GovernmentForm LIKE "%Republic%"

ORDER BY

특정 컬럼의 값으로 데이터 정렬에 사용되는 문법

  • 오름차순 인구순으로 국가의 리스트를 출력 (ASC는 생략이 가능)

    1
    SELECT * FROM country ORDER BY population ASC
  • 내림차수 인구순으로 국가의 리스트를 출력

    1
    SELECT * FROM country ORDER BY population DESC
  • 국가 코드를 알파벳 순으로 정렬하고 같은 국가 코드를 가지면 인구순으로 내림차순으로 정렬

    1
    SELECT * FROM city ORDER BY CountryCode ASC, Population DESC

LIMIT

LIMIT은 조회하는 데이터의 수를 제한할수 있습니다.

  • 인구가 많은 상위 5개 국가 데이터를 출력

    1
    SELECT * FROM country ORDER BY population DESC LIMIT 5
  • 인구가 많은 상위 6위 ~ 8위의 3개 국가 데이터를 출력

    1
    SELECT * FROM country ORDER BY population DESC LIMIT 5, 3

GRUOP BY, HAVING

GROUP BY는 여러개의 동일한 데이터를 가지는 특정 컬럼을 합쳐주는 역할을 하는 명령입니다.

SQL에는 아래와 같은 그룹함수가 있습니다.
COUNT, MAX, MIN, AVG, VAR_SAMP, STDDEV

  • COUNT

    • city 테이블의 CountryCode를 묶고 각 코드마다 몇개의 데이터가 있는지 확인
      1
      2
      sql> SELECT CountryCode, COUNT(CountryCode) FROM city
      GROUP BY CountryCode
    • countrylanguage 테이블에서 전체 언어가 몇개 있는지 구하시오.
      • DISTINCT 중복을 제거해주는 문법
        1
        2
        sql > SELECT COUNT(DISTINCT(Language)) as language_count
        FROM countrylanguage
  • MAX

    • 대륙별 인구수와 GNP 최대 값을 조회
      1
      2
      3
      4
      5
      6
      7
      8
              sql> SELECT continent, MAX(Population) as Population, MAX(GNP) as GNP
      FROM country GROUP BY continent
      ```
      - MIN
      - 대륙별 인구수와 GNP 최소 값을 조회 (GNP와 인구수가 0이 아닌 데이터 중에서)
      ```
      sql> SELECT continent, MIN(Population) as Population, MIN(GNP) as GNP FROM country
      WHERE GNP != 0 AND Population != 0 GROUP BY continent
  • SUM

    • 대륙별 총 인구수와 총 GNP
      1
      2
      3
      sql> SELECT continent, SUM(Population) as Population, SUM(GNP) as GNP
      FROM country
      WHERE GNP != 0 AND Population != 0 GROUP BY continent
  • AVG

    • 대륙별 평균 인구수와 평균 GNP 결과를 인구수로 내림차순 정렬
      1
      2
      3
      4
      sql> SELECT continent, AVG(Population) as Population, AVG(GNP) as GNP
      FROM country
      WHERE GNP != 0 AND Population != 0 GROUP BY continent
      ORDER BY Population DESC
  • HAVING

    GROUP BY에서 반환되는 결과에 조건을 줄수 있습니다.

    • 대륙별 전체인구를 구하고 5억이상인 대륙만 조회

      1
      2
      3
      sql> SELECT continent, SUM(Population) as Population FROM country
      GROUP BY continent
      HAVING Population > 500000000
    • 대륙별 평균 인구수, 평균 GNP, 1인당 GNP한 결과를 1인당 GNP가 0.01 이상인 데이터를 조회하고 1인당 GNP를 내림차순으로 정렬

      1
      2
      3
      4
      5
      sql> SELECT continent, AVG(Population) as Population, AVG(GNP) as GNP, AVG(GNP) / AVG(Population) * 1000 as AVG
      FROM country
      WHERE GNP != 0 AND Population != 0 GROUP BY continent
      HAVING AVG > 0.01
      ORDER BY AVG DESC
  • WITH ROLLUP

    • 고객과 스탭별 매출과 고객별 매출의 총합을 출력
      1
      2
      sql> SELECT customer_id, staff_id, SUM(amount) as amount FROM payment
      GROUP BY customer_id, staff_id WITH ROLLUP

Comment and share

데이터 베이스 모델링

개념적 모델링

업무분석해서 핵심 데이터의 집합을 정의하는 과정

논리적 모델링

개념적 모델링을 상세화 하는 과정

물리적 모델링

논리적 모델링을 DBMS에 추가하기 위해 구체화하는 과정

자료형, 키 값등 설정

Comment and share

MYSQL 설치 (AWS에서 작업)

  1. AWS EC2 인스턴스에 Ubuntu OS에 MySQL 5.7.x 버전 설치

  2. EC2 인스턴스 생성

    • t2.micro
    • Ubuntu 18.04 버전
    • 보안그룹에서 3306 포트 추가
  3. EC2 인스턴스에 접속

  4. pem 파일 400 권한으로 변경

    1
    $ ssh -i (PEM File location) ubuntu@(AWS Public IP)
  5. apt-get 업데이트

    1
    2
    $ sudo apt-get update -y 
    $ sudo apt-get upgrade -y
  6. MySQL Server 설치

    1
    $ sudo apt-get install -y mysql-server mysql-client
  7. MySQL secure 설정

    1
    2
    3
    4
    5
    6
    $ sudo mysql_secure_installation 
    Would you like to setup VALIDATE PASSWORD plugin? N
    New password: rada
    Re-enter new password: rada Remove anonymous users? Y
    Disallow root login remotely? N
    Remove test database and access to it? Reload privilege tables now? Y
  8. MySQL 패스워드 설정

    1
    2
    3
    4
    5
    6
    $ sudo mysql
    mysql> SELECT user,authentication_string,plugin,host FROM mysql.user;
    mysql> ALTER USER 'root'@'localhost' IDENTIFIED WITHmysql_native_password BY 'rada';
    mysql> FLUSH PRIVILEGES;
    mysql> SELECT user,authentication_string,plugin,host FROM mysql.user;
    mysql> exit
  9. 설정한 패스워드를 입력하여 접속

    1
    2
    $ mysql -u root -p  
    Enter password: rada
  10. 외부접속 설정

    1
    $ sudo vi /etc/mysql/mysql.conf.d/mysqld.cnf
    • bind-address를 127.0.0.1을 0.0.0.0 으로 변경

      bind-address = 0.0.0.0 (모든 IP에서 접속가능)

  11. 외부접속 패스워드 설정

    1
    mysql> grant all privileges on *.* to root@'%' identified by 'rada';
  12. 서버 시작 종료 상태 확인

    1
    2
    3
    4
    $ sudo systemctl start mysql.service
    $ sudo systemctl stop mysql.service
    $ sudo systemctl restart mysql.service
    $ sudo systemctl status mysql.service
  13. 설정 후 서버 재시작으로 설정 내용 적용

    1
    $ sudo systemctl restart mysql.service
  14. password 변경 : rada로 패스워드를 변경하는 경우

    1
    mysql> ALTER USER 'root'@'localhost' IDENTIFIED BY 'rada';

샘플 데이터 추가 (Local에서 작업)

  1. 서버로 sql 파일을 전송

    1
    $ scp -i ~/.ssh/rada.pem ~/Desktop/sql/* ubuntu@15.164.231.87:~/
  2. 데이터 베이스 생성

    1
    2
    3
    4
    5
    $ mysql -u root -p
    sql> create database world;
    sql> create database sakila;
    sql> create database employees;
    sql> quit
  3. 데이터 베이스에 데이터 추가

    1
    2
    3
    4
    $ mysql -u root -p world < world.sql
    $ mysql -u root -p sakila < sakila-schema.sql
    $ mysql -u root -p sakila < sakila-data.sql
    $ mysql -u root -p employees < employees.sql

Mysql Workbench 사용법

Comment and share

Design Patterns

디자인 패턴이란

  • 자주 발생하는 문제를 해결하기 위해 설계된 재사용 가능한 해결책
    • Don’t reinvent the wheel
  • 소프트웨어 설계 문제를 쉽게 해결할 수 있도록 패턴화된 설계 방식
  • 팀원들이 공유할 수 있는 공통의 언어가 되어 소통을 원활하게 함

디자인 패턴의 구조

  • 문맥 (Context)
    • 패턴이 적용될 수 있는 문제 상황을 기술
  • 문제 (Problem)
    • 패턴이 적용되어 해결되어야 하는 여러 설계 이슈를 기술
  • 해결 (Solution)
    • 문제를 해결하는 설계 구성 요소와 구성 요소 사이의 관계를 기술

디자인 패턴의 종류

  • Gang of four 패턴

    • 생성 패턴 (Creational patterns)
      • 객체의 생성 방식에 관련된 패턴
      • Abstract Factory, Factory Method, Singleton …
    • 구조 패턴 (Structural patterns)
      • 클래스/객체를 조합한 구조를 가지는 패턴
      • Composite, Decorator …
    • 동작 패턴 (Behavioral patterns)
      • 클래스/객체 사이의 동작 분배에 관련된 패턴
      • Observer, State, Strategy, Template Method, Command …
  • 동시성 패턴 (Concurrency patterns)

    • Scheduling, Monitor, Lock …
  • 아키텍처 패턴 (Architecture patterns)

    • Model-View-Controller, Model-View-Presenter, Model-View-ViewModel …
  • 기타 패턴

    • Dependency injection, Lazy loading, Mock object …

대표적인 디자인 패턴

  • 싱글톤 패턴

    • 단 하나의 객체만 존재할 수 있는 클래스를 구현하는 패턴
    1
    2
    3
    4
    5
    6
    7
    8
    9
    10
    11
    12
    class Singleton {
    private static Singleton instance;

    private Singleton() {}

    public static Singleton getInstance() {
    if(instance == null) {
    instance = new Singleton();
    }
    return instance;
    }
    }
  • 팩토리 패턴

    • 구상 클래스 객체를 전담하여 생성하는 클래스를 구현하는 패턴
    • 팩토리 메소드 패턴 (ref)

    img1

    1
    2
    3
    4
    5
    6
    7
    8
    9
    10
    11
    12
    13
    14
    15
    16
    17
    18
    19
    20
    21
    22
    23
    24
    25
    26
    27
    28
    29
    30
    31
    32
    33
    34
    35
    36
    37
    38
    39
    40
    41
    42
    43
    44
    45
    46
    47
    48
    49
    50
    51
    52
    53
    54
    55
    56
    57
    58
    59
    60
    61
    interface Shape {
    void draw();
    }

    class Rectangle implements Shape {
    @Override
    public void draw() {
    System.out.println("Inside Rectangle::draw() method.");
    }
    }

    class Square implements Shape {
    @Override
    public void draw() {
    System.out.println("Inside Square::draw() method.");
    }
    }

    class Circle implements Shape {
    @Override
    public void draw() {
    System.out.println("Inside Circle::draw() method.");
    }
    }

    class ShapeFactory {


    Shape getShape(String shapeType){
    if(shapeType == null){
    return null;
    }
    if(shapeType.equalsIgnoreCase("CIRCLE")){
    return new Circle();

    } else if(shapeType.equalsIgnoreCase("RECTANGLE")){
    return new Rectangle();

    } else if(shapeType.equalsIgnoreCase("SQUARE")){
    return new Square();
    }

    return null;
    }
    }
    class FactoryPatternDemo {
    public static void main(String[] args) {
    ShapeFactory shapeFactory = new ShapeFactory();

    Shape shape1 = shapeFactory.getShape("CIRCLE");
    shape1.draw();

    Shape shape2 = shapeFactory.getShape("RECTANGLE");

    shape2.draw();

    Shape shape3 = shapeFactory.getShape("SQUARE");

    shape3.draw();
    }
    }
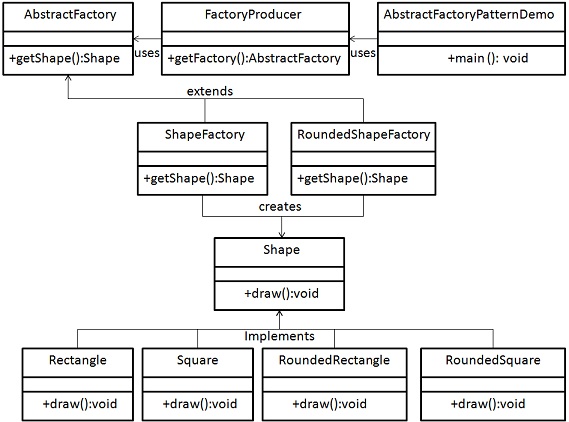
    • 추상 팩토리 패턴 (ref)

    img2

    1
    2
    3
    4
    5
    6
    7
    8
    9
    10
    11
    12
    13
    14
    15
    16
    17
    18
    19
    20
    21
    22
    23
    24
    25
    26
    27
    28
    29
    30
    31
    32
    33
    34
    35
    36
    37
    38
    39
    40
    41
    42
    43
    44
    45
    46
    47
    48
    49
    50
    51
    52
    53
    54
    55
    56
    57
    58
    59
    60
    61
    62
    63
    64
    65
    66
    67
    68
    69
    70
    71
    72
    73
    74
    75
    76
    77
    78
    79
    80
    public interface Shape {
    void draw();
    }

    class RoundedRectangle implements Shape {
    @Override
    public void draw() {
    System.out.println("Inside RoundedRectangle::draw() method.");
    }
    }

    class RoundedSquare implements Shape {
    @Override
    public void draw() {
    System.out.println("Inside RoundedSquare::draw() method.");
    }
    }

    class Rectangle implements Shape {
    @Override
    public void draw() {
    System.out.println("Inside Rectangle::draw() method.");
    }
    }

    abstract class AbstractFactory {
    abstract Shape getShape(String shapeType) ;
    }

    class ShapeFactory extends AbstractFactory {
    @Override
    public Shape getShape(String shapeType){
    if(shapeType.equalsIgnoreCase("RECTANGLE")){
    return new Rectangle();
    }else if(shapeType.equalsIgnoreCase("SQUARE")){
    return new Square();
    }
    return null;
    }
    }

    class RoundedShapeFactory extends AbstractFactory {
    @Override
    public Shape getShape(String shapeType){
    if(shapeType.equalsIgnoreCase("RECTANGLE")){
    return new RoundedRectangle();
    }else if(shapeType.equalsIgnoreCase("SQUARE")){
    return new RoundedSquare();
    }
    return null;
    }
    }

    class FactoryProducer {
    public static AbstractFactory getFactory(boolean rounded){
    if(rounded){
    return new RoundedShapeFactory();
    }else{
    return new ShapeFactory();
    }
    }
    }

    class AbstractFactoryPatternDemo {
    public static void main(String[] args) {
    AbstractFactory shapeFactory = FactoryProducer.getFactory(false);

    Shape shape1 = shapeFactory.getShape("RECTANGLE");
    shape1.draw();
    Shape shape2 = shapeFactory.getShape("SQUARE");
    shape2.draw();

    AbstractFactory shapeFactory1 = FactoryProducer.getFactory(true);

    Shape shape3 = shapeFactory1.getShape("RECTANGLE");
    shape3.draw();
    Shape shape4 = shapeFactory1.getShape("SQUARE");
    shape4.draw();
    }
    }
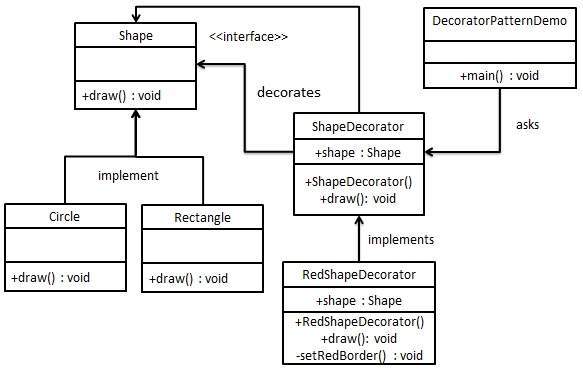
  • 데코레이터 패턴

    • 생성자를 이용해 객체에 일정한 기능을 추가하는 패턴 (ref)

    img3

    1
    2
    3
    4
    5
    6
    7
    8
    9
    10
    11
    12
    13
    14
    15
    16
    17
    18
    19
    20
    21
    22
    23
    24
    25
    26
    27
    28
    29
    30
    31
    32
    33
    34
    35
    36
    37
    38
    39
    40
    41
    42
    43
    44
    45
    46
    47
    48
    49
    50
    51
    52
    53
    54
    55
    56
    57
    58
    59
    60
    61
    62
    63
    64
    65
    66
    67
    interface Shape {
    void draw();
    }

    class Rectangle implements Shape {

    @Override
    public void draw() {
    System.out.println("Shape: Rectangle");
    }
    }

    class Circle implements Shape {

    @Override
    public void draw() {
    System.out.println("Shape: Circle");
    }
    }

    abstract class ShapeDecorator implements Shape {
    protected Shape decoratedShape;

    public ShapeDecorator(Shape decoratedShape){
    this.decoratedShape = decoratedShape;
    }

    public void draw(){
    decoratedShape.draw();
    }
    }

    class RedShapeDecorator extends ShapeDecorator {

    public RedShapeDecorator(Shape decoratedShape) {
    super(decoratedShape);
    }

    @Override
    public void draw() {
    decoratedShape.draw();
    setRedBorder(decoratedShape);
    }

    private void setRedBorder(Shape decoratedShape){
    System.out.println("Border Color: Red");
    }
    }

    class DecoratorPatternDemo {
    public static void main(String[] args) {

    Shape circle = new Circle();

    Shape redCircle = new RedShapeDecorator(new Circle());

    Shape redRectangle = new RedShapeDecorator(new Rectangle());
    System.out.println("Circle with normal border");
    circle.draw();

    System.out.println("\nCircle of red border");
    redCircle.draw();

    System.out.println("\nRectangle of red border");
    redRectangle.draw();
    }
    }
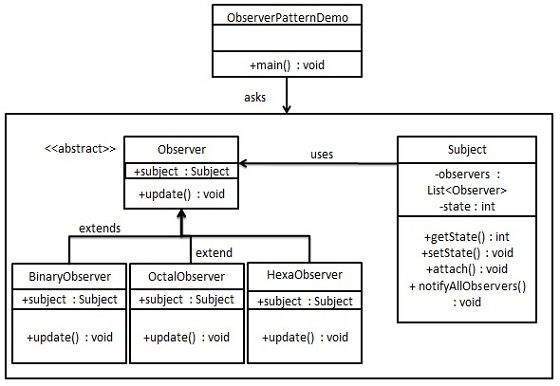
  • 옵저버 패턴

    • Observable 객체의 변화를 Observer에서 알 수 있도록 하는 패턴 ref

    img4

    1
    2
    3
    4
    5
    6
    7
    8
    9
    10
    11
    12
    13
    14
    15
    16
    17
    18
    19
    20
    21
    22
    23
    24
    25
    26
    27
    28
    29
    30
    31
    32
    33
    34
    35
    36
    37
    38
    39
    40
    41
    42
    43
    44
    45
    46
    47
    48
    49
    50
    51
    52
    53
    54
    55
    56
    57
    58
    59
    60
    61
    62
    63
    64
    65
    66
    67
    68
    69
    70
    71
    72
    73
    74
    75
    76
    77
    78
    79
    80
    81
    82
    class Subject {
    private List<Observer> observers = new ArrayList<Observer>();
    private int state;

    public int getState() {
    return state;
    }

    public void setState(int state) {
    this.state = state;
    notifyAllObservers();
    }

    public void attach(Observer observer){
    observers.add(observer);
    }

    public void notifyAllObservers(){
    for (Observer observer : observers) {
    observer.update();
    }
    }
    }

    abstract class Observer {
    protected Subject subject;
    public abstract void update();
    }

    class BinaryObserver extends Observer{

    public BinaryObserver(Subject subject){
    this.subject = subject;
    this.subject.attach(this);
    }

    @Override
    public void update() {
    System.out.println( "Binary String: " + Integer.toBinaryString( subject.getState() ) );
    }
    }

    class OctalObserver extends Observer{

    public OctalObserver(Subject subject){
    this.subject = subject;
    this.subject.attach(this);
    }

    @Override
    public void update() {
    System.out.println( "Octal String: " + Integer.toOctalString( subject.getState() ) );
    }
    }

    class HexaObserver extends Observer{

    public HexaObserver(Subject subject){
    this.subject = subject;
    this.subject.attach(this);
    }

    @Override
    public void update() {
    System.out.println( "Hex String: " + Integer.toHexString( subject.getState() ).toUpperCase() );
    }
    }

    class ObserverPatternDemo {
    public static void main(String[] args) {
    Subject subject = new Subject();

    new HexaObserver(subject);
    new OctalObserver(subject);
    new BinaryObserver(subject);

    System.out.println("First state change: 15");
    subject.setState(15);
    System.out.println("Second state change: 10");
    subject.setState(10);
    }
    }

Comment and share

애노테이션 (Annotations)

애노테이션이란

  • 애노테이션의 사전적인 의미는 주석
  • JVM, 컴파일러, 프레임워크 등에게 전달하는 메타데이터로 사용됨

기본 애노테이션

애노테이션 설명 비고
@Override 상속하여 오버라이드된 메소드
@Deprecated 앞으로 사라질 예정임을 표기
@SuppressWarnings 컴파일러에게 특정 경고 메세지를 무시하도록 한다. eg. @SuppressWarnings(“unused”)
@FunctionalInterface 함수형 인터페이스임을 표기 (Lambda)

애노테이션의 구성 요소

  • 애노테이션의 작성
    • 추상 메소드와 유사한 형태로 구현
1
2
3
4
5
@Target({TYPE, FIELD, METHOD, PARAMETER, CONSTRUCTOR, LOCAL_VARIABLE}) // 메타 애노테이션
@Retention(RetentionPolicy.SOURCE) // 메타 애노테이션
public @interface SuppressWarnings { // 애노테이션 선언
String [] value(); // 애노테이션 속성
}
  • 애노테이션의 사용
    • key=value 형태로 애노테이션에 속성의 값 전달
1
2
3
4
5
@SuppressWarnings(value = {"unused", "rawtypes"}) // 키 = 값 배열
@SuppressWarnings(value = "unused") // 값이 하나인 경우 배열 생략 가능
@SuppressWarnings({"unused", "rawtypes"}) // 속성이 value 하나인 경우 키 생략 가능

@CustomAnnotation(key1 = "value1", key2 = {"value2", "value3"}) // 속성이 여러개인 경우 키를 여러개 사용
  • Target 설정

    • 애노테이션을 사용할 수 있는 대상을 설정

    • ElementType 열거형 상수 사용

      ElementType 범위
      TYPE 클래스, 인터페이스, 애노테이션, 열거형
      FIELD 필드(멤버 변수), 열거형 상수
      METHOD 메소드
      PARAMETER 메소드의 파라미터
      CONSTRUCTOR 생성자
      LOCAL_VARIABLE 로컬 변수
      ANNOTATION_TYPE 애노테이션
      PACKAGE 패키지
  • Retention 설정

    • 애노테이션 정보를 언제까지 유지할 것인지 설정

    • RetentionPolicy 열거형 상수 사용

    • reflection: java.lang.reflect API

      RetentionPolicy 범위
      SOURCE 컴파일러가 사용. 빌드된 .class 파일에는 포함되지 않음
      CLASS .class 파일에 포함되나, VM이 사용하지 않으며 reflection에 정보를 포함하지 않음
      RUNTIME .class에 포함, VM에서 인식, reflection에 정보를 포함

사용자 정의 애노테이션

  • 사용자 정의 애노테이션 구현

    1
    2
    3
    4
    5
    6
    @Retention(RUNTIME)
    @Target(FIELD)
    public @interface CustomAnnotation {
    String value();
    String valueTwo() default "기본값";
    }
  • 사용자 정의 애노테이션 사용

    1
    2
    3
    4
    5
    6
    7
    8
    9
    10
    class CustomAnnotationUsage {
    @CustomAnnotation("game")
    String gameName = "여러분의 틱택토";
    @CustomAnnotation(value = "server", valueTwo = "localhost")
    String serverIP;
    @CustomAnnotation("game")
    String gameMode = "AI vs. AI";
    @CustomAnnotation(value = "server", valueTwo = "8888")
    String serverPort;
    }
  • Reflection을 이용하여 애노테이션에 할당된 값 사용

    1
    2
    3
    4
    5
    6
    7
    8
    9
    10
    11
    12
    13
    14
    15
    16
    17
    18
    19
    20
    21
    22
    23
    24
    class CustomAnnotationTest {
    public static void main(String[] args) throws Exception {
    CustomAnnotationUsage obj = new CustomAnnotationUsage();
    Map<String, Object> gameProp = new HashMap<>();
    Map<String, Object> serverProp = new HashMap<>();

    Field[] fields = CustomAnnotationUsage.class.getDeclaredFields();
    for (Field field: fields) {
    CustomAnnotation annotation = field.getDeclaredAnnotation(CustomAnnotation.class);
    if (field.get(obj) == null) {
    field.set(obj, annotation.valueTwo());
    }
    if (annotation.value().equals("game")) {
    gameProp.put(field.getName(), field.get(obj));
    } else {
    serverProp.put(field.getName(), field.get(obj));
    }
    }

    System.out.println(gameProp);
    System.out.println(serverProp);

    }
    }

Comment and share

자바 컬렉션 프레임워크 (Java Collections Framework; JCF)

컬렉션 프레임워크란

  • java.utils에 속한 일련의 클래스로, 자료구조를 담당
  • 잘 짜여진 인터페이스를 기반으로 다양한 자료구조를 구현
  • 제네릭 클래스로 되어 있어, 다양한 객체를 요소로 담을 수 있다.

JCF 인터페이스

  • List 인터페이스
    • Collection 인터페이스를 상속
    • 순서가 있는 데이터의 집합으로, 데이터의 중복을 허용
    • 구현체: ArrayList, LinkedList(, Vector, Stack)
  • Set 인터페이스
    • Collection 인터페이스를 상속
    • 순서가 없는 데이터의 집합으로, 데이터의 중복을 허용하지 않음
    • 구현체: HashSet, TreeSet
  • Map 인터페이스
    • Key-Value 쌍으로 이루어진 데이터의 집합
    • 구현체: HashMap, TreeMap, Hashtable, Properties

Collection 인터페이스

  • Collection 인터페이스의 주요 메소드

    메소드 설명
    boolean add(E e) 요소 e를 컬렉션에 추가한다.
    boolean addAll(Collection<? exteionds E> c) 다른 컬렉션 c의 모든 요소를 컬렉션에 추가한다.
    void clear() 컬렉션의 모든 요소를 제거한다.
    boolean contains(Object o) 컬렉션에 요소 o가 존재하는지 확인한다.
    boolean containsAll(Collection<?> c) 컬렉션 c의 모든 요소가 컬렉션에 포함되는지 확인한다.
    boolean equals(Object o) 컬렉션 o와 같은 내용을 포함하는지 비교한다.
    boolean isEmpty() 컬렉션이 비어있는지 확인한다.
    Iterator<E> iterator() 컬렉션의 Iterator를 반환한다.
    boolean remove(Object o) 컬렉션에서 요소 o를 제거한다.
    boolean removeAll(Collection<?> c) 컬렉션 c에 속한 모든 요소를 컬렉션에서 제거한다.
    boolean retainAll(Collection<?> c) 컬렉션 c에 포함된 객체만 남기고 나머지 요소를 제거한다.
    int size() 컬렉션에 속한 요소의 개수를 반환한다.
    T[] toArray(T[] a) 컬렉션의 요소들을 T[] 배열로 반환한다.
  • Iterator

    • iterator()로 반환되는 객체로, Collection에 저장된 요소에 접근하기 위해 사용

      메소드 설명
      boolean hasNext() 다음 요소가 있는지 확인
      E next() 다음 요소가 있을 경우 반환
      void remove() 현재 위치의 요소를 삭제
    • Iterator의 활용

      1
      2
      3
      4
      5
      Iterator<String> iter = collection.iterator();
      while (iter.hasNext()) {
      String string = iter.next();
      System.out.println(string);
      }
      1
      2
      3
      for (String string: collection) {
      System.out.println(string);
      }

List 인터페이스

  • 순서가 있는 데이터의 집합을 다루는 인터페이스

  • List는 인덱스를 이용해 요소를 구분할 수 있어, 데이터의 중복을 허용

  • Collection 인터페이스를 상속받았으며, 추가 메소드가 구현되어 있다.

    메소드 설명
    void add(int index, E element) index 위치에 요소 element를 삽입한다.
    boolean addAll(int index, Collection<? extends E> c) index위치부터 컬렉션 c의 모든 요소를 추가한다.
    E get(int index) index 위치에 저장된 요소를 반환한다.
    int indexOf(Object o) 객체 o가 저장된 첫번째 인덱스를 반환한다. 없을 경우 -1을 반환한다.
    int lastIndexOf(Object o) 객체 o가 저장된 마지막 인덱스를 반환한다. 없을 경우 -1을 반환한다.
    ListIterator<E> listIterator() ListIterator 객체를 반환한다.
    E remove(int index) index에 위치한 객체를 제거하고 반환한다.
    E set(int index, E element) index에 위치한 요소를 element로 대체한다.
    List<E> subList(int fromIndex, int toIndex) fromIndex에 위치한 요소부터 toIndex의 직전에 위치한 요소까지 포함한 List를 반환한다.
  • List 인터페이스의 구현체

    1
    2
    List<String> list = new ArrayList<>();
    list = new LinkedList<>(); // 동일 인터페이스로 다른 구현체를 사용 가능
    • ArrayList<E>

      • 제네릭 클래스로 구현된 자료구조

      • 배열을 기반으로 구현된 클래스로, 가장 자주 활용되며 활용도가 높다.

      • ArrayList의 생성자는 세 종류가 주어진다.

        1
        2
        3
        public ArrayList()
        public Arraylist(int initialCapacity)
        public ArrayList(Collection<? extends E>)
    • LinkedList<E>

      • 제네릭 클래스로 구현된 자료구조

      • 연결리스트를 기반으로 구현된 클래스로, 배열의 단점을 극복하기 위한 구현체

      • ArrayList vs. LinkedList

        구현체 순차 추가/수정/삭제 비순차 추가/수정/삭제 조회
        ArrayList 빠름 느림 빠름
        LinkedList 느림 빠름 느림
    • ArrayList, LinkedList

      • Object를 요소로 가지는 List 구현체 (Java5 이전)
  • List의 정렬

    • Collections 클래스의 sort() 메소드 사용
      • public static <T extends Comparable<? super T> void sort(List<T> list)
        • 객체에 선언된 public int compareTo(T t) 메소드로 비교하여 정렬
      • public static <T> void sort(List<T> list, Comparator<? super T> c)
        • Comparator 객체 c에 정의된 public int compare(T o1, T o2) 메소드로 비교하여 정렬
  • ListIterator

    • listIterator()로 반환되는 객체로, 양방향 사용이 가능
    • Iterator를 상속받은 클래스
    메소드 설명
    boolean hasPrevious() 이전 요소가 있는지 확인
    E previous() 이전 요소가 있을 경우 반환

Set 인터페이스

  • 순서가 없는 데이터의 집합을 다루는 인터페이스

  • 중복되는 데이터를 효율적으로 제거하는 데에 쓸 수 있음

  • Collection 인터페이스를 상속받아 메소드를 구현하고 있음

  • Set의 구현체

    • HashSet<E>

      • Set의 대표적인 구현체로, 기본적인 기능이 구현되어 있다.
    • TreeSet<E>

      • NavigableSet<E> 인터페이스를 구현하며, 이진 탐색 트리 자료구조이다.

      • 객체를 삽입하는 동시에 정렬되는 특성상 비교가 가능해야 한다.

        1
        2
        public TreeSet() // Comparable 구현체의 경우
        public TreeSet(Comparator<? super E> comparator) // 별도로 비교 객체 삽입
      • TreeSet의 메소드

      메소드 설명
      public E first() 정렬된 첫 요소를 반환
      public E last() 정렬된 마지막 요소를 반환
      public E lower(E e) e 객체의 바로 이전 객체를 반환
      public E higher(E e) e 객체의 바로 다음 객체를 반환
      public E floor(E e) e 또는 e 보다 이전 객체를 반환
      public E ceiling(E e) e 또는 e 보다 이후 객체를 반환
      public E pollFirst() 정렬된 첫 요소를 제거하고 반환
      public E pollLast() 정렬된 마지막 요소를 제거하고 반환
      public NavigableSet<E> descendingSet() 내림차순으로 정렬하는 객체를 반환
      public NavigableSet<E> headSet(E toElement, boolean inclusive) toElement 이전 요소로 구성된 객체 반환
      public NavigableSet<E> tailSet(E fromElement, boolean inclusive) fromElement 이후 요소로 구성된 객체 반환
      public NavigableSet<E> subSet(E fromElement, boolean fromInclusive, E toElement, boolean toInclusive) fromElement 이후, toElement 이전 요소로 구성된 객체 반환

Map 인터페이스

  • Key와 Value의 쌍으로 구성된 자료의 집합을 다루는 인터페이스\

    • Key, Value 쌍은 Map.Entry<K, V> 객체로 관리
  • Key는 중복될 수 없으며, Value는 중복이 가능

  • Map<K, V>의 구현체

    • HashMap<K, V> : 가장 많이 사용되는 Map의 구현체
    • TreeMap<K, V> : 정렬 기준이 더해진 NavigableMap을 구현한 구현체
    • Hashtable<K, V> : HashMap과 유사하지만 성능이 떨어지는 대신 멀티스레드에 안전한 구현체
    • Properties : 속성 파일을 손쉽게 관리하는, Hashtable<K, V>의 하위 클래스 구현체
  • Map<K, V>의 주요 메소드

    메소드 설명
    void clear() Map의 모든 요소를 삭제
    boolean containsKey(Object key) key가 존재하는지 여부를 반환
    boolean containsValue(Object value) value가 존재하는지 여부를 반환
    Set<Map.Entry<K,V>> entrySet() Map의 Entry 요소를 Set에 담아 반환
    V get(Object key) key에 해당하는 value 객체 반환
    Set<K> keySet() key 요소를 Set 형태로 반환
    V put(K key, V value) key와 value 쌍으로 구성된 Entry 추가. 기존에 등록된 key라면 해당 value를, 없으면 null을 반환
    void putAll(Map<? extends K, ? extends V> m) m에 속한 모든 Entry를 추가
    V remove(Object key) key에 해당하는 Entry를 제거하고 반환. 등록되지 않은 key라면 null 반환
    Collection<V> values value 객체들을 Collection에 담아 반환
    int size() Map에 포함된 Entry 객체의 수 반환
    boolean isEmpty() Map에 데이터가 없는지 여부 반환
  • TreeMap<K, V>의 주요 메소드

    메소드 설명
    public Map.Entry<K, V> firstEntry() 정렬된 첫 Entry 반환
    public Map.Entry<K, V> lastEntry() 정렬된 마지막 Entry 반환
    public Map.Entry<K, V> lowerEntry(K key) key 바로 이전 Entry 반환
    public Map.Entry<K, V> higherEntry(K key) key 바로 다음 Entry 반환
    public Map.Entry<K, V> floorEntry(K key) key 또는 key 보다 이전 Entry 반환
    public Map.Entry<K, V> ceilingEntry(K key) key 또는 key 보다 이후 Entry 반환
    public Map.Entry<K, V> pollFirstEntry() 정렬된 첫 Entry를 제거하고 반환
    public Map.Entry<K, V> pollLastEntry() 정렬된 마지막 Entry를 제거하고 반환
    public NavigableSet<E> descendingKeySet() 내림차순으로 정렬하는 Set 반환
    public NavigableSet<E> descendingKeyMap() 내림차순으로 정렬하는 Map 반환
    public NavigableMap<K, V> headMap(K toKey, boolean inclusive) toKey 이전 Entry로 구성된 객체 반환
    public NavigableMap<K, V> tailMap(K fromKey, boolean inclusive) fromKey 이후 Entry로 구성된 객체 반환
    public NavigableMap<K, V> subMap(K fromKey, boolean fromInclusive, K toKey, boolean toInclusive) fromKey 이후, toKey 이전 Entry로 구성된 객체 반환
  • Properties의 주요 메소드

    메소드 설명
    getProperty() key에 해당하는 속성 값을 반환
    stringPropertyNames() key의 목록을 Set<String>으로 반환
    setProperty() key로 value를 등록하고 기존 value 값을 반환
    load() reader를 이용해 속성을 읽어온다. (.properties)
    loadFromXML() XML 형식으로 저장된 속성을 읽어온다.
    store() writer를 이용해 속성을 저장한다.
    storeToXML() XML 형식으로 속성 파일을 저장한다.

Comment and share

I/O

I/O와 스트림

  • I/O란 입출력(Input/Output)을 함께 부르는 것
  • 자바의 I/O는 스트림을 이용해 데이터를 주고 받는 형식으로 이루어짐
    • 데이터의 소스와 목적지를 노드(node)라 부름
    • 노드는 키보드, 모니터, 파일, 메모리, 데이터베이스, 다른 프로그램 등이 될 수 있음

노드 스트림

InputStream과 Reader

  • InputStream의 주요 메소드 (byte 단위)

    메소드 설명
    int read() byte 하나를 읽어서 int로 반환. 읽을 값이 없으면 -1
    int read(byte b[]) 데이터를 읽어 b를 채우고, 읽은 바이트 수를 반환
    int read(byte b[], int offset, int len) 최대 len개의 바이트를 읽어 b의 offset 위치부터 채운다.
    void close() 스트림을 종료하고 자원을 반납
    int available() 읽을 수 있는 데이터의 크기를 반납
    long skip(long n) 스트림에서 n만큼 건너 뛴다.
    void mark(int readLimit) reset()으로 돌아갈 위치를 표시한다. readLimit은 돌릴 수 있는 최대 바이트 수
    void reset() mark()가 호출된 지점으로 돌아간다.
    boolean markSupported() mark, reset 메소드의 지원 여부를 반환
    1
    2
    3
    4
    5
    6
    7
    8
    try (InputStream input = System.in) {
    int read = -1;
    while ((read = input.read()) != -1) {
    System.out.printf("Integer: %d\nCharacter: %c\n", read, read);
    } catch(IOException e) {
    e.printStackTrace();
    }
    }
  • Reader의 주요 메소드 (char 단위)

    메소드 설명
    int read() char 하나를 읽어서 int로 반환. 읽을 값이 없으면 -1
    int read(char cbuf[]) 데이터를 읽어 cbuf를 채우고, 읽은 char 수를 반환
    int read(char cbuf[], int off, int len) 최대 len개의 char를 읽어 cbuf의 offset 위치부터 채운다.
    int read(java.nio.CharBuffer target) NIO target에 데이터를 저장한다.
    void close() 스트림을 종료하고 자원을 반납
    int available() 읽을 수 있는 데이터의 크기를 반납
    long skip(long n) 스트림에서 n만큼 건너 뛴다.
    void mark(int readAheadLimit) reset()으로 돌아갈 위치를 표시한다. readLimit은 돌릴 수 있는 최대 바이트 수
    void reset() mark()가 호출된 지점으로 돌아간다.
    boolean markSupported() mark, reset 메소드의 지원 여부를 반환

OutputStream과 Writer

  • OutputStream의 주요 메소드 (byte 단위)

    메소드 설명
    void write(int b) b 내용을 byte로 출력
    void write(byte b[]) b를 문자열로 변환하여 출력
    void write(byte b[], int off, int len) b의 off부터 (off + len - 1)만큼을 문자열로 변환하여 출력
    void close() 스트림을 종료하고 자원을 반납. close() 내부적으로 flush() 호출
    void flush() 버퍼 스트림에서 버퍼의 내용을 출력하고 비운다.
  • Writer의 주요 메소드 (char 단위)

    메소드 설명
    void write(int c) c 내용을 char로 출력
    void write(char cbuf[]) cbuf를 문자열로 변환하여 출력
    void write(char cbuf[], int off, int len) cbuf의 off부터 (off + len - 1)만큼을 문자열로 변환하여 출력
    void write(String str) str을 출력한다.
    void write(String str, int off, int len) str의 off부터 (off + len - 1)만큼을 출력
    Writer append(CharSequence csq) csq를 출력하고 Writer 반환
    Writer append(CharSequence csq, int start, int end) csq의 start부터 end까지를 출력하고 Writer 반환
    Writer append(char c) c를 출력하고 Writer 반환
    void close() 스트림을 종료하고 자원을 반납. close() 내부적으로 flush() 호출
    void flush() 버퍼 스트림에서 버퍼의 내용을 출력하고 비운다.

다양한 입출력 처리

  • 메모리 기반의 입/출력

    1
    2
    3
    4
    5
    6
    7
    8
    9
    10
    11
    12
    char[] memory = "메모리 입출력 테스트".toCharArray();
    char[] buffer = new char[5];
    int read = 0;
    try (CharArrayReader reader = new CharArrayReader(memory);
    CharArrayWriter writer = newCharArrayWriter();) {
    while ((read = reader.read(buffer) > 0)) {
    wrtier.write(buffer, 0, read);
    }
    System.out.println(Arrays.toString(writer.toCharArray()));
    } catch (IOException e) {
    e.printStackTrace();
    }
  • 파일 기반의 입출력

    • 생성자 및 생성/삭제 메소드

      생성자 및 메소드 설명
      File(String pathname) pathname에 해당하는 파일 생성. 기본 경로는 애플리케이션의 시작 경로
      File(String parent, String child) parent 경로 아래 child 파일 생성
      File(File parent, String child) parent 경로 아래 child 파일 생성
      File(URI uri) file로 시작하는 URI 객체를 이용해 파일 생성
      boolean createNewFile() 새로운 파일을 생성
      boolean mkdir() 새로운 디렉토리를 생성
      boolean mkdirs() 경로상의 모든 디렉토리를 생성
      boolean delete() 파일/디렉토리 삭제
      void deleteOnExit() 애플리케이션 종료시 자동으로 삭제
      1
      2
      3
      4
      5
      6
      7
      8
      9
      10
      11
      12
      13
      14
      String filePath = "D:" + File.separator + "Temp" + File.separator + "MyTemp";

      File fileOne = new File(filePath);
      fileOne.mkdir();

      File fileTwo = new File(filePath, "file2.txt");
      fileTwo.createNewFile();

      File fileThree = new File(fileOne, "file3.txt");
      fileThree.createNewFile();

      File fileFour = new File(new URI("file:///d:/Temp/MyTemp/file4.txt"));
      fileFour.createNewFile();
      fileFour.deleteOnExit();
    • File 클래스의 주요 메소드

      • getName(), getParent(), getParentFile(), getPath()
      • isAbsolute(), getAbsolutePath(), getCanonicalPath(), toURI()
      • canRead(), canWrite()
      • isDirectory(), isFile()
      • length(), list(), listFiles(), lastModified(), renameTo()
    • FileInputStream, FileOutputStream

      • 파일명이나 File 객체를 이용하여 입출력 스트림 생성 가능
      • FileOutputStream에서 boolean append를 true로 하면 기존 파일에 이어서 쓴다.
    • FileReader, FileWriter

      • 파일명이나 File 객체를 이용하여 입출력 Reader 생성 가능
      • FileWriter에서 boolean append를 true로 하면 기존 파일에 이어서 쓴다.

보조 스트림

보조 스트림의 특징

  • 스트림에 부가적인 기능 제공
  • 노드(데이터 소스/목적지)와 직접 연결되지 않고, 다른 스트림과 연결
  • Stream Chaining: 스트림을 여러개 연결하여 사용

보조 스트림의 종류

보조 스트림 기능
InputStreamReader byte 스트림을 char 스트림으로 변환
OutputStreamWriter byte 스트림을 char 스트림으로 변환
BufferedReader 버퍼링을 통해 스트림 속도 향상
BufferedWriter 버퍼링을 통해 스트림 속도 향상
BufferedInputStream 버퍼링을 통해 스트림 속도 향상
BufferedOutputStream 버퍼링을 통해 스트림 속도 향상
DataInputStream 기본 데이터형 전송
DataOutputStream 기본 데이터형 전송
ObjectInputStream 객체 전송
ObjectOuputStream 객체 전송
PrintWriter 문자열 표현으로 출력
PrintStream 문자열 표현으로 출력

스트림 자료형 변경

  • 캐릭터셋: utf-8, ms949, euc-kr

    1
    2
    3
    4
    5
    InputStreamReader readerOne = new InputStreamReader(System.in);
    InputStreamReader readerTwo = new InputStreamReader(System.in, "utf-8");

    OutputStreamWriter writerOne = new OutputStreamWriter(System.out);
    OutputStreamWriter writerTwo = new OutputStreamWriter(System.out, "ms949");

버퍼를 이용한 스트림

  • 기본 버퍼 크기: 8192 bytes

    1
    2
    3
    4
    5
    6
    7
    8
    9
    10
    11
    12
    13
    14
    15
    16
    17
    18
    19
    20
    21
    22
    23
    24
    25
    26
    27
    static void copyStream(InputStream input, OutputStream output) throws IOException {
    byte [] buff = new byte[1024];
    int read = -1;
    while ((read = input.read(buff) > 0)) {
    output.write(buff, 0, read);
    }
    }

    public static void main(String[] args) {
    File src = new File("C:/Windows/explorer.exe");
    File dst = new File("C:/temp/explorer.exe");
    try (FileInputStream in = new FileInputStream(src);
    FileOutputStream out = new FileOutputStream(target);
    BufferedInputStream buffIn = new BufferedInputStream(in);
    BufferedOutputStream buffOut = new BufferedOutputStream(out);) {
    long start = System.nanoTime();
    copyStream(in, out);
    System.out.println(System.nanoTime() - start);

    long start = System.nanoTime();
    copyStream(bin, bout);
    System.out.println(System.nanoTime() - start);
    } catch (IOException e) {
    e.printStackTrace();
    }

    }
  • BufferedReader는 readLine() 메소드를 사용할 수 있다.

    1
    2
    3
    4
    5
    6
    7
    8
    9
    File src = new File("./src.txt");
    try (BufferedReader buffReader = new BufferedReader(new FileReader(src));) {
    String line = null;
    while ((line = br.readLine()) != null) {
    System.out.println(line);
    }
    } catch (IOException e) {
    e.printStackTrace();
    }

기본 데이터형 전송 스트림

  • byte, char 외에 다른 기본 데이터형도 전송 가능한 스트림

    • 읽은 후에는 자료형을 알 수 없으므로 쓴 순서대로 읽어야 함
    클래스 메소드
    DataInputStream boolean readBoolean()
    byte readByte()
    short readShort()
    int readInt()
    long readLong()
    float readFloat()
    double readDouble()
    char readChar()
    String readUTF()
    DataOutputStream void writeBoolean(bool v)
    void writeByte(byte v)
    void writeShort(short v)
    void writeInt(int v)
    void writeLong(long v)
    void writeFloat(float v)
    void writeDouble(double v)
    void writeChar(char v)
    void writeUTF(String v)
    1
    2
    3
    4
    5
    6
    7
    8
    9
    10
    11
    12
    13
    File src = new File("c:/Temp/data.dat");
    try (DataOutputStream out = new DataOutputStream(new FileOutputStream(src))) {
    out.writeUTF("김패캠");
    out.writeInt(15);
    out.writeFloat(14.23);
    }

    try (DataInputStream in = new DataInputStream(new FileInputStream(src))) {
    String string = in.readUTF();
    int integer = in.readInt();
    float floatNum = in.readFloat();
    System.out.println(string + " " + integer + " " + floatNum);
    }

객체 저장을 위한 스트림

  • 일반적인 참조형 객체를 저장하기 위한 스트림

  • 직렬화(Serialization)와 역직렬화(Deserialization) 사용

    1
    2
    3
    4
    5
    6
    7
    8
    9
    10
    11
    12
    13
    14
    15
    16
    17
    18
    19
    20
    21
    22
    23
    24
    25
    26
    27
    28
    29
    30
    31
    32
    33
    34
    35
    36
    class Foo implements Serializable { // has-a 관계의 모든 클래스가 Serializable이어야 함
    static final long serialVersionUID = 1L; // 객체의 버전 관리

    String userName;
    int id;

    transient String passWord;

    @Override
    public String toString() {
    return userName + " " + id + " " + passWord;
    }
    }

    class FooTest {
    public static void main (String [] args) {
    File dst = new File("C:/Temp/obj.data");
    Foo foo = new Foo();
    foo.userName = "김사탕";
    foo.id = 142;
    foo.passWord = "qwer1234";

    try (ObjectOutputStream out = new ObjectOutputStream(new FileOutputStream(dst));
    ObjectInputStream in = new ObjectInputStream(new FileInputStream(dst));) {
    out.writeObject(foo);
    Object read = in.readobject();
    if (read != null && read instanceof Foo) {
    Foo readFoo = (Foo)read;
    System.out.println(readFoo);
    }
    } catch (IOException | ClassNotFoundException e) {
    e.printStackTrace();
    }
    }
    }

  • 부모 클래스가 Serializable이 아닌 경우 자식 클래스에서 직접 처리

    • writeObject(), readObject()를 자식 클래스에서 직접 구현
    1
    2
    3
    4
    5
    6
    7
    8
    9
    10
    11
    12
    13
    14
    15
    16
    17
    18
    19
    class ParentFoo {
    int memVarOne;
    double memVarTwo;
    }

    class ChildFoo extends ParentFoo implements Serializable {
    @Override
    private void writeObject(ObjectOutputStream out) throws IOException {
    out.writeInt(memVarOne);
    out.writeDouble(memVarTwo);
    out.defaultWriteObject();
    }
    @Override
    private void readObject(ObjectInputStream in) throws IOException, ClassNotFoundException {
    memVarOne = in.readInt();
    memVarTwo = in.readDouble();
    in.defaultReadObject();
    }
    }

Comment and share

Yechan Kim

author.bio


author.job